How do I create a SIP Trunk?
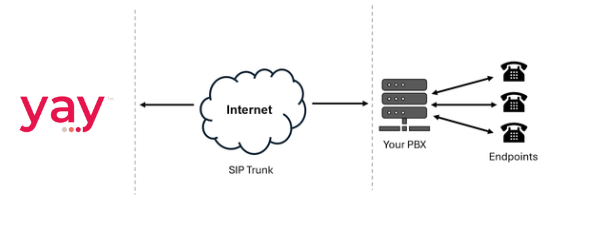
With a SIP trunk, you can make a call to a Yay.com number and send that call to your on-premise PBX or other IP based third party phone system.
The SIP trunk is the virtual connection between Yay.com and the system that you would like to send calls to. Modern hardware and software based PBX's will generally let you connect to your VoIP provider via a SIP Trunk to make and receive calls.
Please read this FAQ with more detail on SIP Trunks and what they are.
To set up a SIP Trunk in order to send calls to your 3rd party PBX, follow the instructions below:
1. Select the Voice option on the far-left of your Admin Dashboard.
2. Select SIP Trunks from the Menu.
3. Click Show IP Ranges to see information on the IP addresses and ports you will need to allow through your firewall in order for the SIP Trunk to work.
Click this link to view our complete Firewall guide.
4. Click the Add Trunk button.
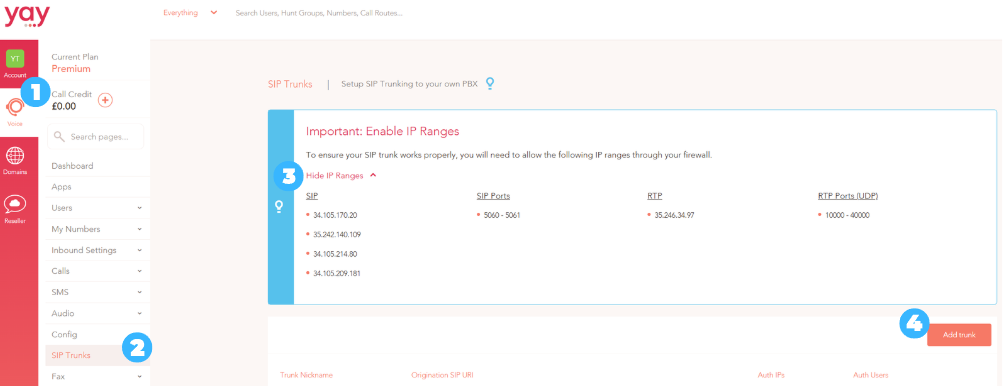
You can now create the SIP trunk which will allow you to send calls to a third party PBX.
Continuing with the steps:
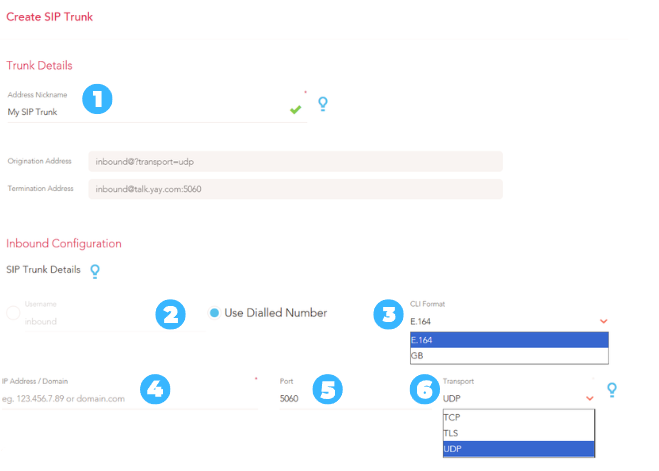
1. The Address Name is a unique name that you can create to identify this trunk from any other trunks that you may have set up.
2. When passing the call from Yay.com to your PBX, this can be authenticated by displaying the Yay.com number that was dialled to your PBX (select the option on the right), or you can set up a Username (on the left).
Note: If you are setting up a Username, information regarding the dialled number is still passed to your PBX.
3. You can choose which CLI Format you would like to use from the drop-down provided.
The E.164 will be the default option. This is the standard for formatting international telephone numbers. The format is: +[country code][subscriber number].
Alternatively, you can use GB which will be UK standard formatting that strips the + and the country code. The telephone numbers will start with a 0, followed by the local area code and subscriber number.
4. The IP Address / Domain is essentially the destination that you want to send the call to when the Yay.com number is dialled. You can enter the public IP address for your PBX or the domain name (host name) that it can be reached on. We recommend the use of Fully Qualified Domain Names (FQDN) due to IP addresses being dynamic and subject to change.
5. Customise the network port to be used for SIP communication so that your PBX can be invited to accept the call from Yay.com. The default SIP port is 5060.
6. Select the Transport type for communication. The options are TCP, TLS or UDP.
Please speak to your PBX provider if you need help configuring it to accept calls that have been sent via the SIP trunk. We are unable to provide support for setting up 3rd party systems due to the large number options available on the market and varying firmware versions etc.
As well as being able to send calls made to a Yay.com number to your own PBX (inbound), you can also have calls that are made from your PBX be routed out to an external number via a Yay.com outbound SIP trunk.
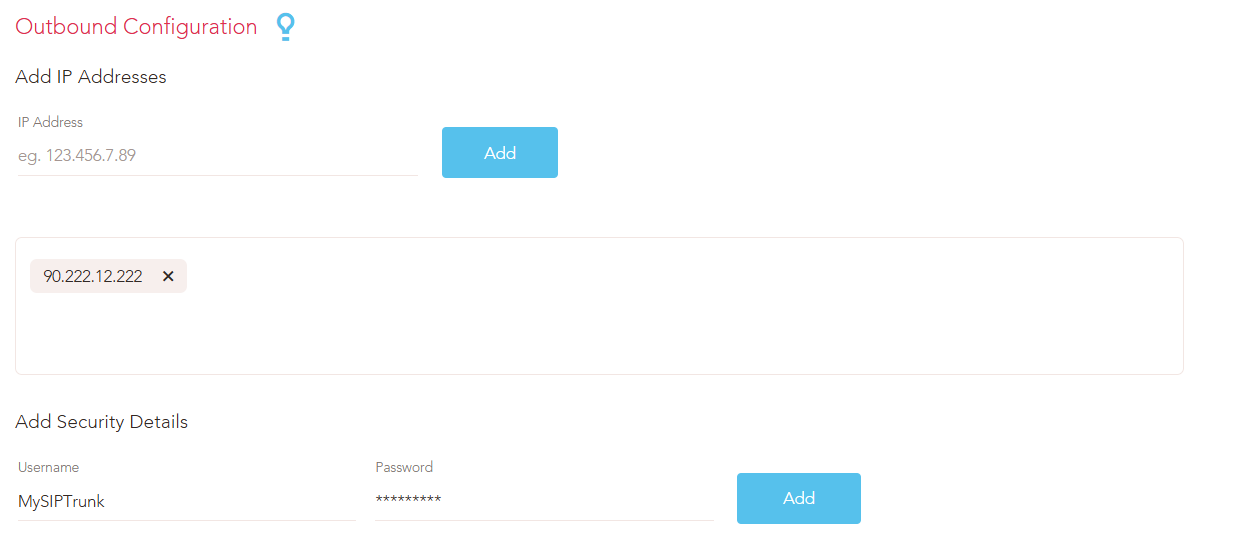
To configure an Outbound SIP trunk on the Yay.com side, you just need to add the public IP address for the PBX that you are sending calls from.
You can add multiple IP addresses if you are using more than one PBX. By default the system will allow any outbound call from the IP address(es) that you have specified, but you can also set up a Username and Password to authenticate the calls. Your PBX will have to pass the Username and password for the call to be completed by Yay.com.
Please note that we cannot support the setup on the trunk on your PBX or equipment, we can only advise on what to do on the Yay.com side.