How do I edit my User?
Your Yay.com users are the individual phone lines/extensions that each member of your team will be using to make and receive their phone calls.
There are quite a lot of settings you can configure under each user; this document will go through each variable and explain what you can change it to, and what it does.
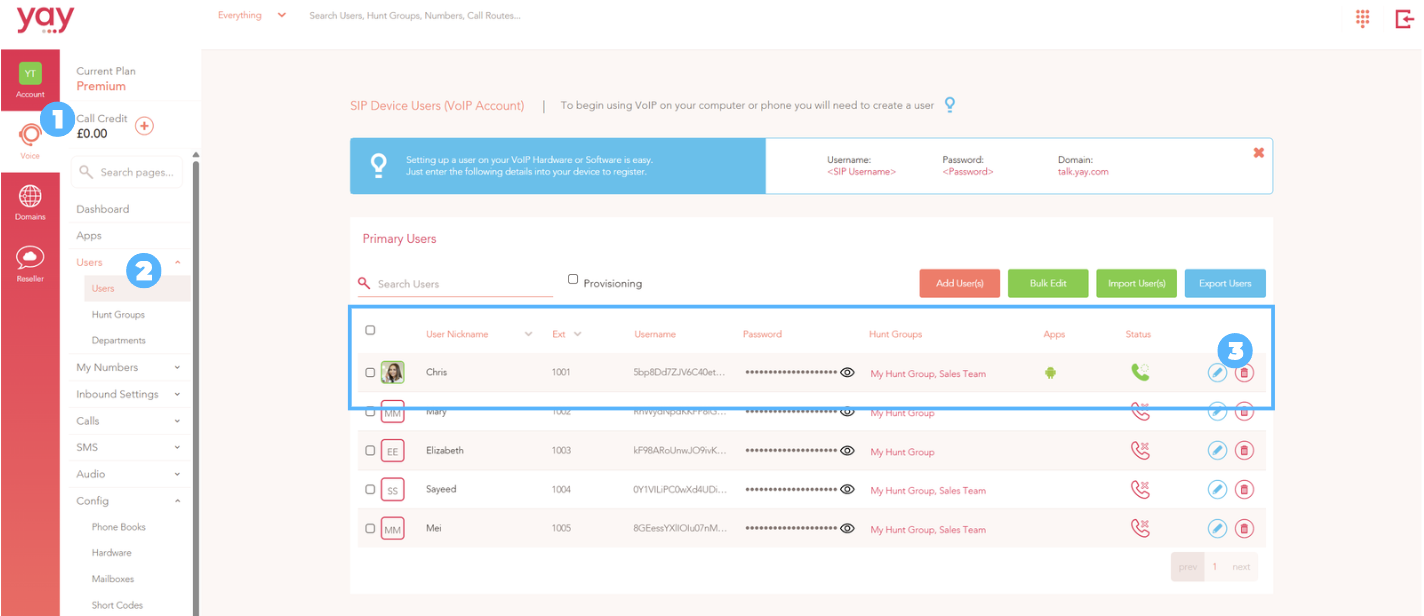
Firstly, you will need to navigate to the Users section to edit your extensions. To do this:
1. Head to Voice
2. Then Users
3. Then press the blue pencil (edit) button next to the user you would like to edit
SIP User Details
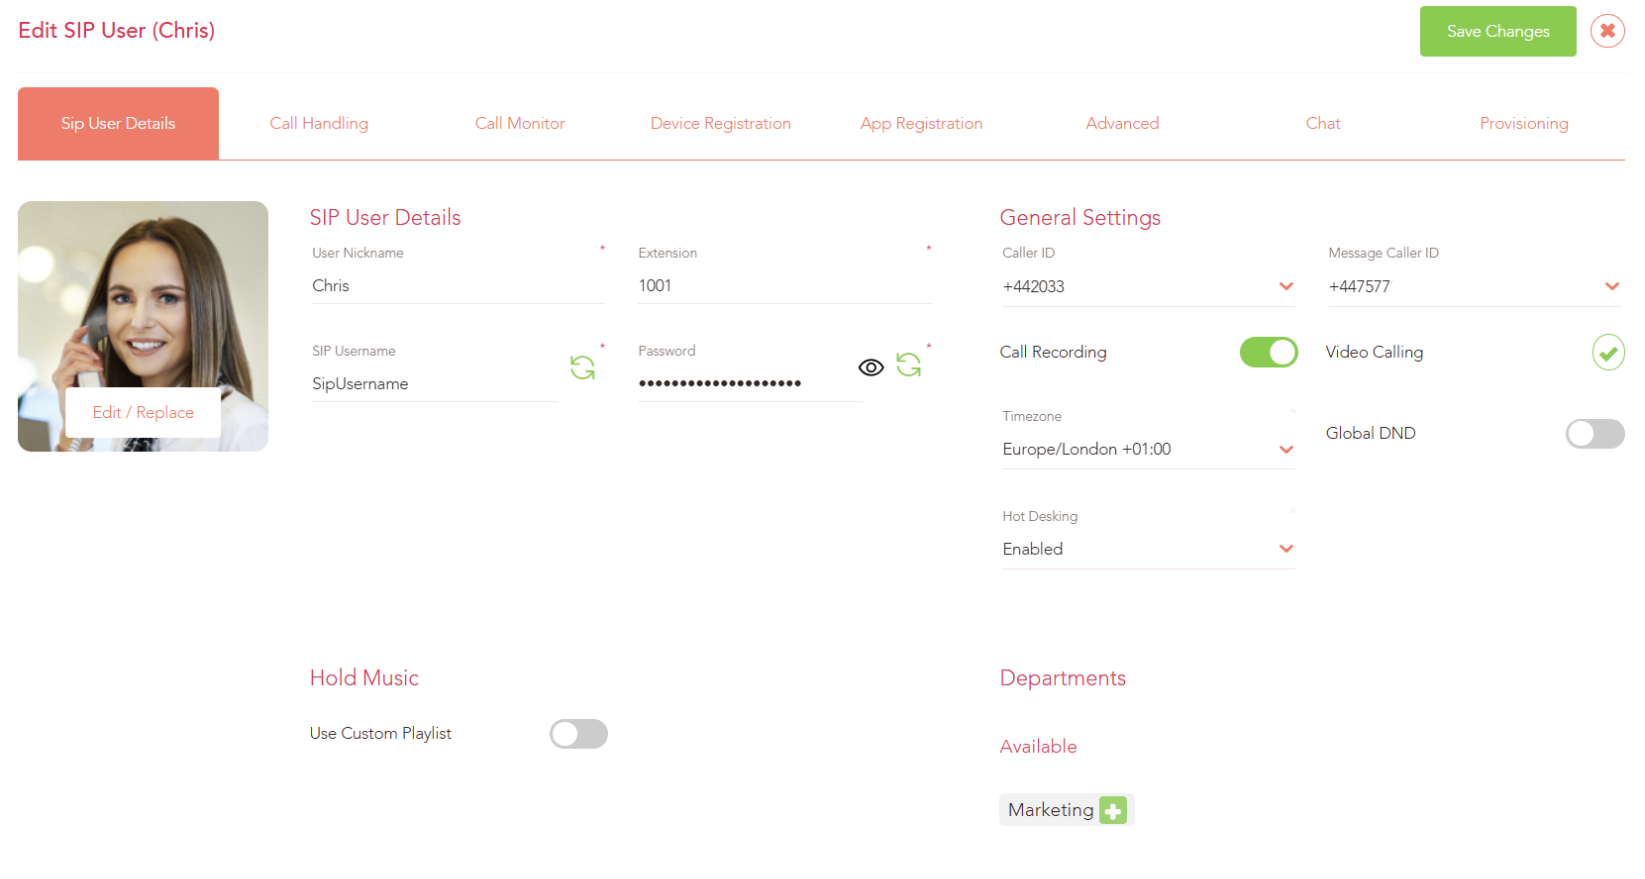
This is the name of the user, and what will appear on the call history when this user makes/receives calls, or what other users on the account see as this user’s name
Extension -
This is the user’s extension number, and is the value that is dialled when you try to call this extension. This value can be 3-5 digits long.
SIP Username -
This is the username that a SIP device needs in order to connect the device to the user. This is an important variable and should be kept secure to avoid your user becoming compromised.
SIP Password -
This is the password that a SIP device needs in order to connect the device to the user. This is an important variable and should be kept secure to avoid your user becoming compromised.
Hold Music -
If toggled on, you can select a custom hold music to be used when this customer makes an outbound/internal call and places the caller on hold. Otherwise if left unselected, the default hold music will be used instead.
Caller ID -
The default Caller ID that will be used for the user on their apps/SIP devices when making an outbound call.
Message Caller ID -
The default Caller ID that will be used for the user on their apps/SIP devices when sending an outbound SMS. This has to be a UK mobile phone number.
Call Recording -
If toggled on, outbound/internal calls from the user will be recorded. This setting does not matter if the Global Call Recording is set to enabled/disabled, as this will be overwritten by that setting.
Video Calling -
This setting can’t be changed, but lets you know that video calling between SIP devices is enabled on this user. This is not referring to video calling on the Yay.com application.
Timezone -
You can set the timezone on a per-user basis, perfect for when you have a multi-national company. This timezone affects the time the user sees on their apps/deskphones, and what time will be read out loud when listening to voicemail messages.
Global DND -
Sets the user’s Global DND status to on or off - syncs with the same setting on connected handsets and apps.
Hotdesking -
This has 3 different settings:
Disabled: This user cannot be logged into a hotdesking device
Enabled: This user can be logged into a hotdesking device
Enabled with PIN: This user can be logged into a hotdesking device, but only if a PIN is entered
Departments -
You will see any departments this user is assigned to here.
Call Handling
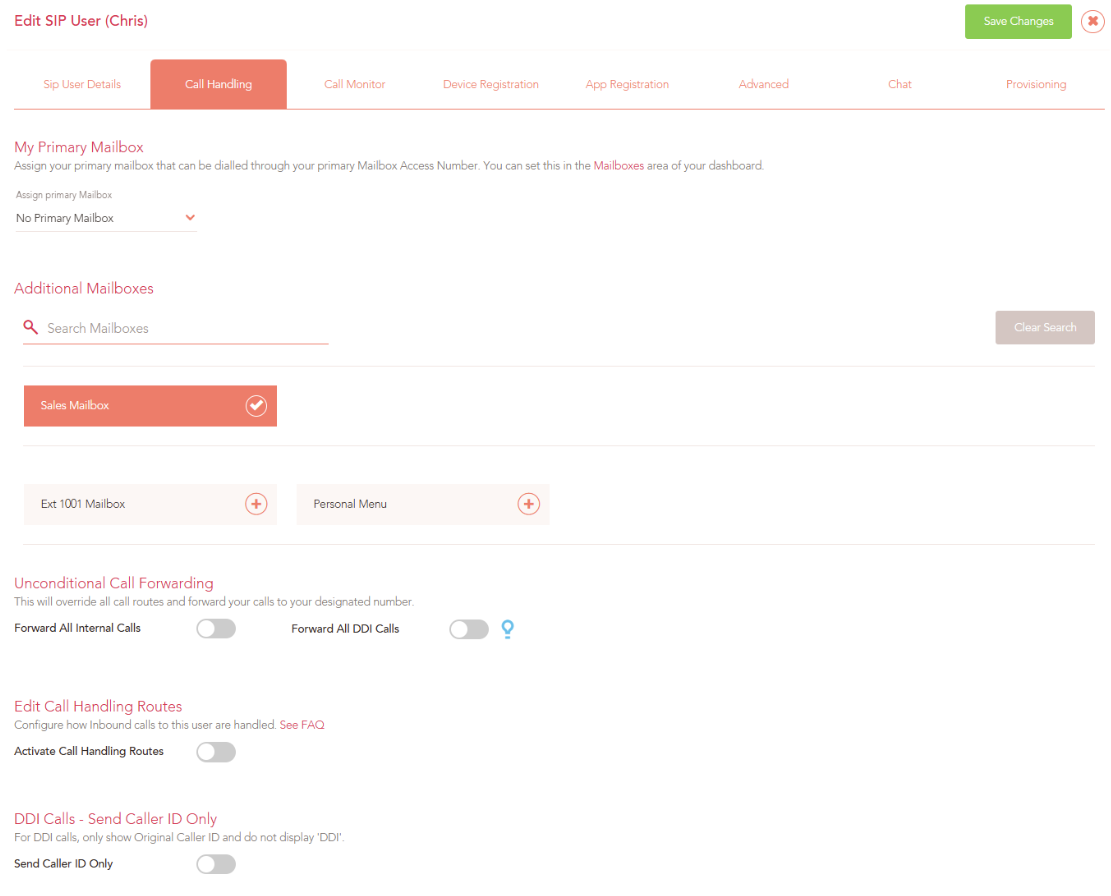
This is the mailbox that will be accessible by the accounts Personal Mailbox Access Number (by default this is ‘8000’). An auto-provisioned VoIP device will have this mailbox as the one that showcases the Message Waiting Indicator (MWI), or is accessible by its pre-designated mailbox button.
Additional Mailboxes -
You can assign other mailboxes to this user, but these mailboxes will only be accessible in the user’s desktop/mobile app, and not on their VoIP device.
Unconditional Call Forwarding -
From here you can set up a destination to automatically forward calls to, depending on how the call came in.
Forward all Internal Calls: Will forward calls to your user originating from another user on the account.
Forward all DDI Calls: Will forward calls to your user that originate from a number on your account that points calls directly at your user (a DDI).
Edit Call Handling Routes -
You can have different routings occur depending on if your user is already busy, unavailable, or simply misses the call.
DDI Calls - Send Caller ID Only -
When you receive a DDI call, by default we display the call as, “DDI - <Caller_ID>”. With this setting turned on, the DDI call would just show as “<Caller_ID>”.
Call Monitor
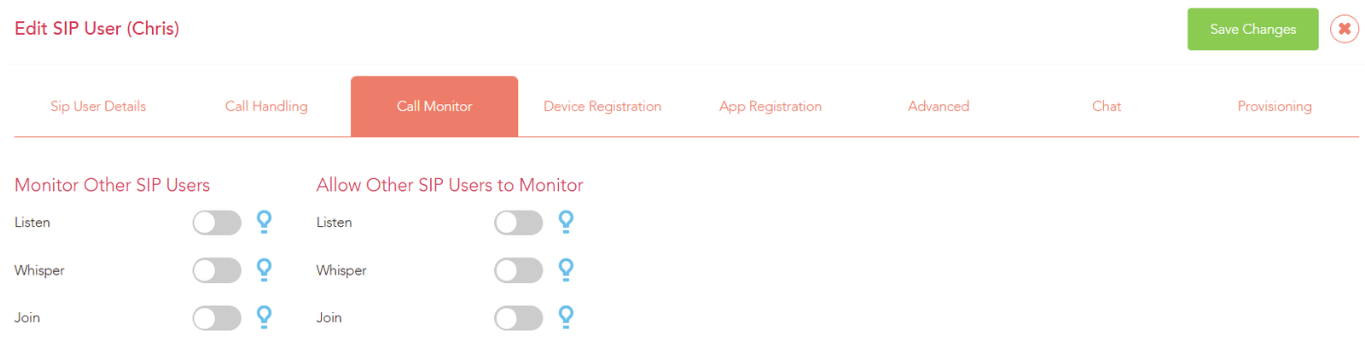
Monitor Other SIP Users -
This will enable the user the ability to Listen, Whisper, or Join in on a call that another user is on (if that user has the Allow Other SIP Users to Monitor permissions enabled as well)
Allow Other SIP Users to Monitor -
This will allow other users the ability to Listen, Whisper, or Join in on a call that this user is on (if that user has the Monitor Other SIP Users permissions enabled as well)
Device Registration
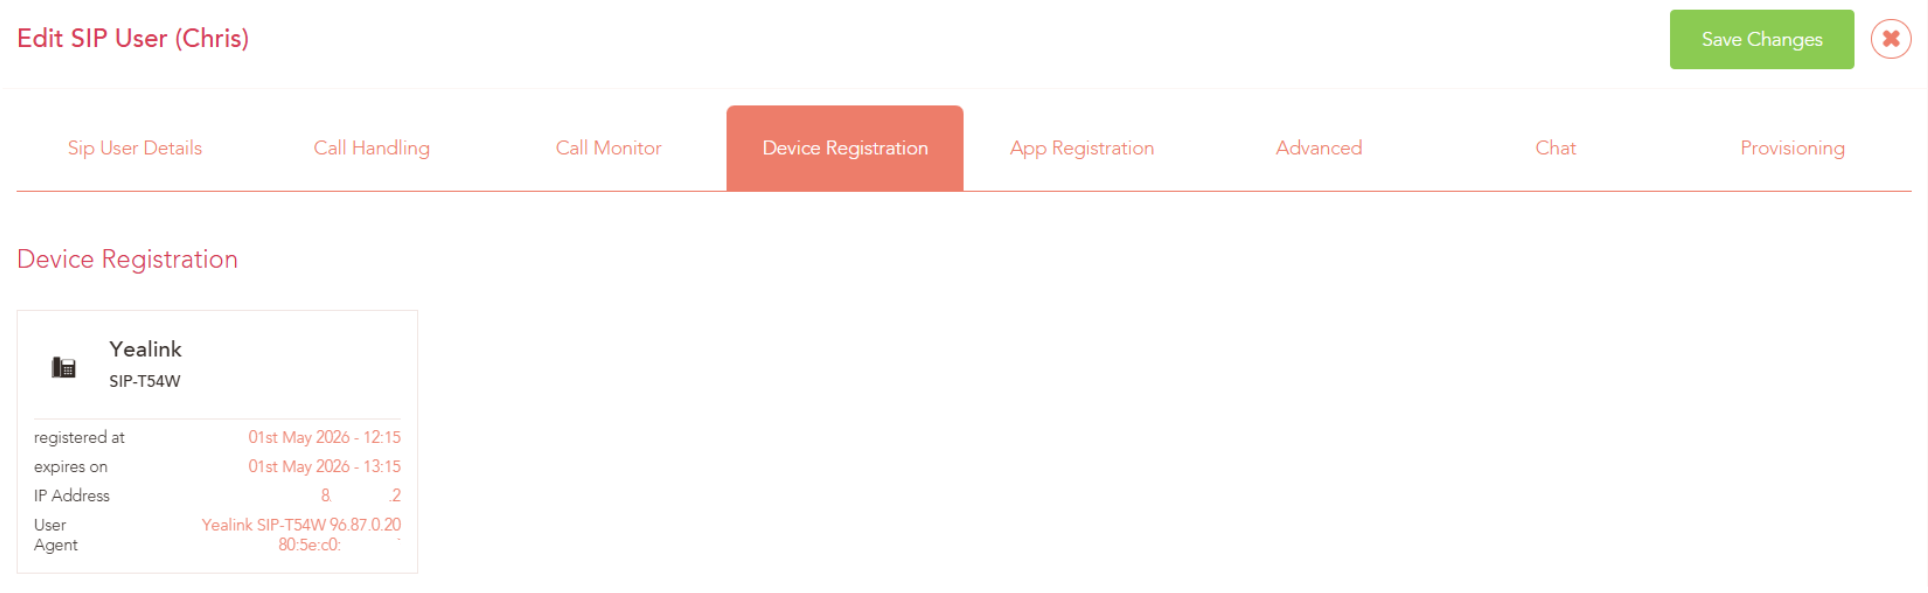
This section showcases every SIP device or Desktop App registration that is currently online with this user. This includes:
- External Softphones
- VoIP Devices
- VoIP Adaptors
- Desktop App Logins
In the example above, a Yealink T54W is connected, and as it is auto-provisioned, it also showcases the firmware version, the MAC address, the IP address, and the last time it registered to Yay.com.
App Registration
Mobile Number -
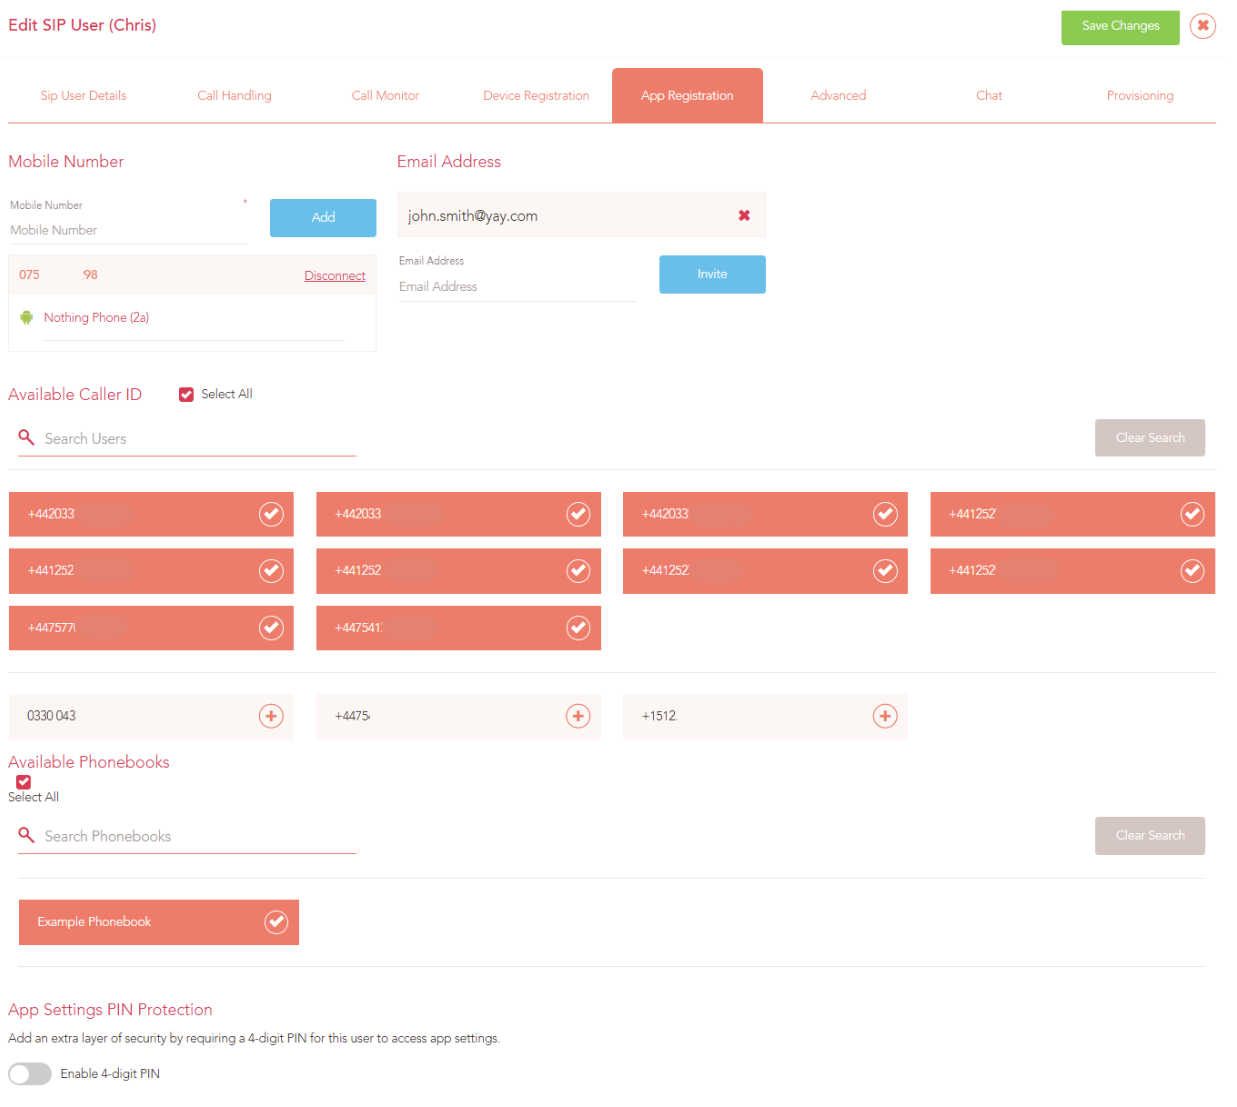
Displays all mobile numbers that are registered with this user to be used as a login method, along with the device model used with that number to login.
You can enter a new mobile number in the field above to add it as a new mobile number for that user, by typing it in and pressing the Add button.
Pressing the Disconnect button next to a pre-existing mobile number will remove it as a login method for this user.
Email Address -
Displays all email addresses that have been set up with this user to be used as a member login method. All member email addresses for the entire account can be seen under Account > Members.
You can also type in a new email address and press invite to add this email as a login method as well. The recipient will receive a new email asking them to create their password and set up their member login.
Available Caller IDs -
Showcases all of the caller IDs on the account. Caller IDs that are ticked are ones that the user can use on the mobile/desktop app, whereas unticked ones will not show up as a caller ID they can use.
Available Phonebooks -
Showcases all of the phonebooks on the account (Voice > Config > Phonebooks). Phonebooks that are ticked are ones that the user can use on the mobile/desktop app, whereas unticked ones will not show up as phonebooks they can view/edit.
App Settings PIN Protection -
If enabled, a 4 pin code can be made which must be entered anytime someone is trying to login to this user.
Advanced
Local Country Code -
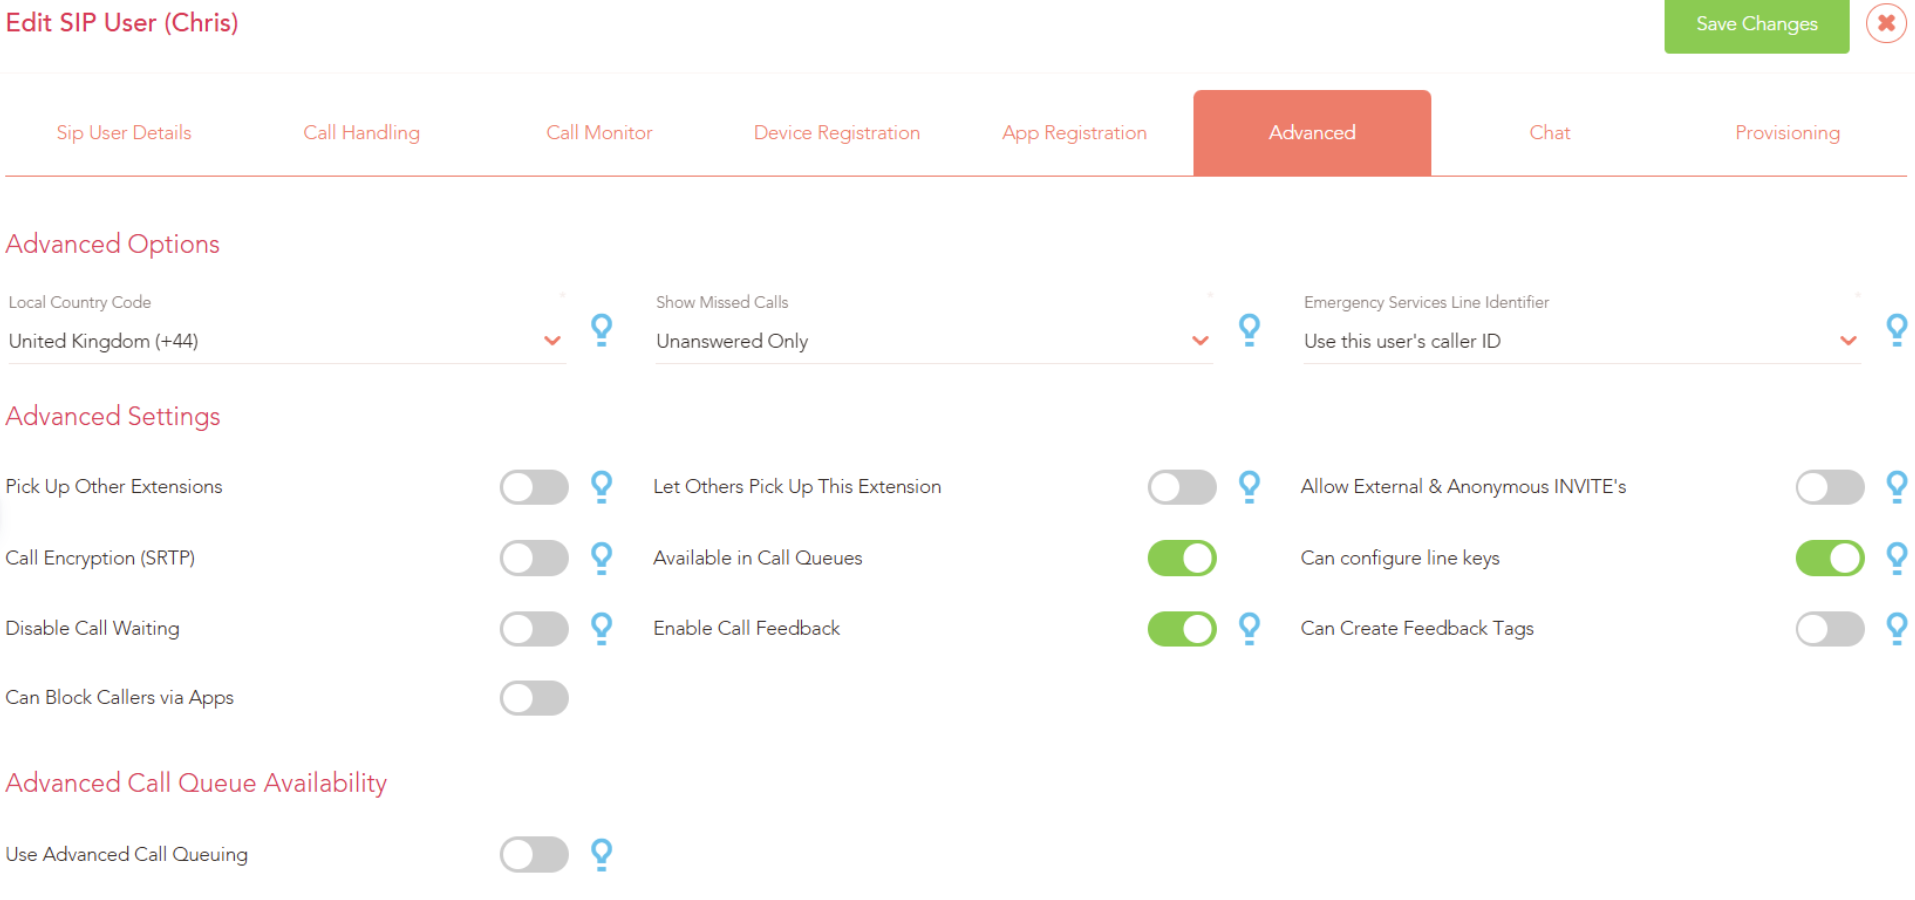
This sets the default international dialling code we will enter at the start of a number you dial.
For example, with this set to ‘United Kingdom (+44)’, we will add the dialing code of ‘+44’ at the start of the number you are trying to dial, so ‘01234 567 890’ becomes ‘+441234567890’.
Show Missed Calls -
This can be set to either Unanswered Only or All.
- Unanswered Only: will only alert you of a missed call if no one on the system answered it, and it went completely unanswered (no other users picked up the call or voicemails).
- All: if this user in particular misses the call, an alert will be sent (even if another user answered the call anyways).
Emergency Services Line Identifier -
Please see this other FAQ which goes into more detail on this option.
Pick Up Other Extensions -
Gives permission to this user to be able to pick up calls that are ringing other users on the account (given that those users have the Let Others Pick Up This Extension option enabled as well)
Let Others Pick Up This Extension -
Gives permission to other users on the account to pick up calls that are ringing this user (given that those users have the Pick Up Other Extensions option enabled as well).
Allow External & Anonymous Invites -
Please see this other FAQ which goes into more detail on this option.
Call Encryption (SRTP) -
When enabled, we will turn on Call Encryption on any auto-provisioned handsets that are assigned to this user.
Available in Call Queues -
When enabled, this user will be able to receive calls that are coming through a call queue specifically.
Can Configure Line Keys -
When enabled, this user has permission to edit their own device line keys within their desktop application.
Disable Call Waiting -
Call Waiting occurs when a user is already on a call, and then receives a second one at the same time. By default we have this enabled, which means you will receive the second call at the same time as being active on the first call.
With this disabled, we will always treat your user as busy when already on a call, and the second call will not ring you.
Enable Call Feedback -
The user will be prompted with a call feedback form at the end of every call on the Yay.com app if this is enabled.
Can Create Feedback Tags -
The user can create their own feedback tags when filling out a feedback form when this is enabled.
Can Block Callers via Apps -
With this enabled, the user can add numbers to a blocklist for either inbound/outbound calls via the call history section of their app.
Use Advanced Call Queueing -
When enabled, instead of the user simply seeing a toggle to turn on/off their call queue availability within the Yay.com app, they will instead have the option to select a call queue status.
Chat
Chat Enabled -
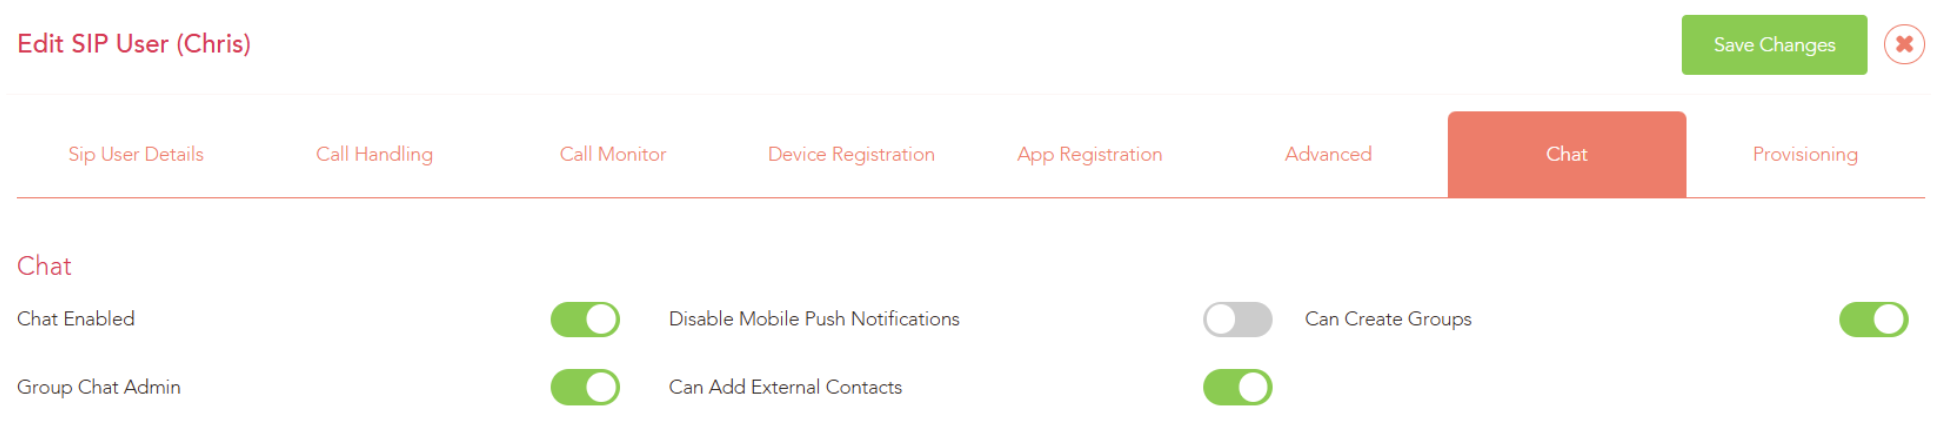
Determines whether or not the user can use that chat function within the Yay.com app.
Disable Mobile Push Notifications -
When enabled, the user will not receive notifications on their mobile phone when they receive a chat message on the app.
Can Create Groups -
Gives the user the ability to create a brand new group chat within the app.
Group Chat Admin -
Gives the user the permission to remove people from group chats, or add new members.
Can Add External Contacts -
If enabled, a user can message users who are from an account that is bridged with their own (the other bridged users also need this enabled for the user to message them).
Provisioning
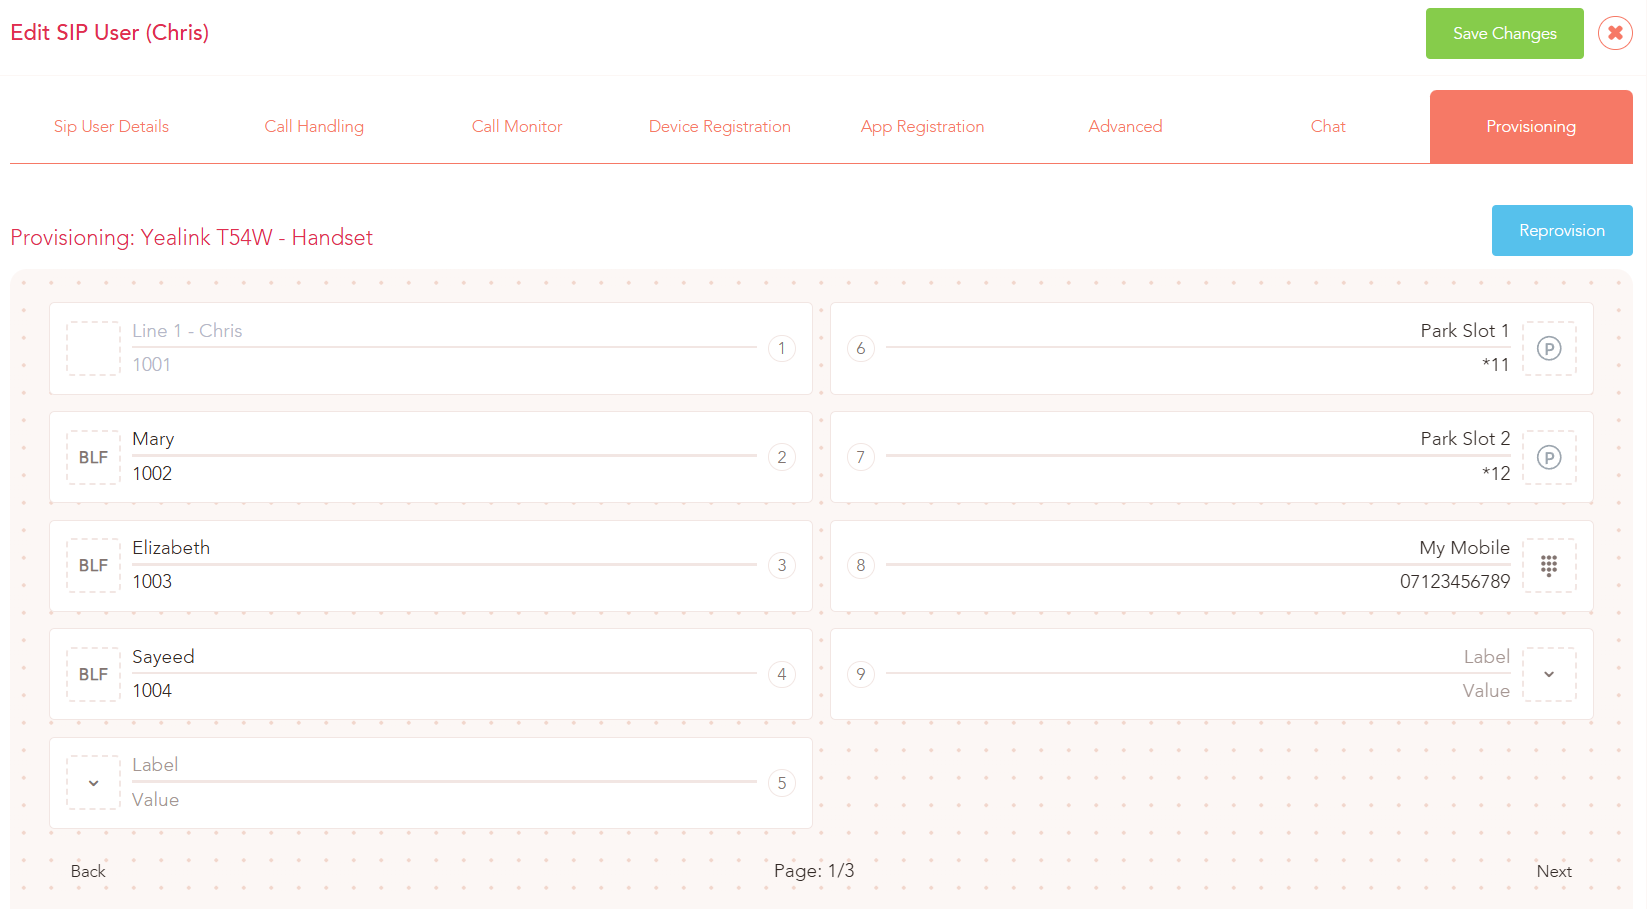
This section will automatically populate with your auto-provisioned device’s line keys and layout, if the device has line keys available.
Otherwise, you will see a default layout which does not adhere to one particular brand/model of VoIP device.
In the example above, there is a Yealink T54W device connected, which has 9 line keys available on the first page, and 3 pages in total.
Each section represents a line key, and can be customised with a label, a value, and the type of line key. Please see below the different types of line keys we offer:
BLF -
This is best explained in this FAQ on how to set it up.
With Yay.com, BLFs will interact properly with either the extension numbers of users (to showcase their call status), or with the extension number of a mailbox (to showcase if they have a new message).
Speed Dial -
When this line key is pressed, the phone will simply dial whatever you inputted as the value of the line key.
Prefix -
This line key is normally pressed when you are not on a call. When you press it, the phone will type out whatever the value is, but will not dial it, allowing you to type in further digits after the prefix.
For example, if you want to be able to dial Guildford numbers easily, you can set the prefix as ‘01483’, and now when you press the line key, the area code for Guildford will already be typed out and you can dial the rest of the number quicker!
DTMF -
This line key is used when already on a call - when pressed, the phone will type out the value of this line key (digit by digit) without dialling the destination.
This is perfect for automatically dialling a short code mid-call without needing to remember what the code is.
Call Park -
Set the value of this line key to the short code on your account for call parking (usually *11 - *15) and you can use it to park calls and retrieve them.
The line key will show as green when the parking slot is empty, and red when it is occupied.
Please see this FAQ for more detail about call parking.