How do I place calls into a Queue?
Creating a Call Route for placing calls into Call Queues is nice and simple - we have a module specifically designed for it! If you've never created a call route before, click and have a read through this guide on how to create a Call Route.
Before you can route calls to a Queue, you will need to go to Voice > Inbound Settings> Call Queuing in the Dashboard to create a Queue. You will also need a Queue Notice in order to apply audio so that you can provide useful information to callers such as telling them what their queue position is and what their hold time is likely to be.
Click this guide to Create a Queue
Click on this guide to Create a Queue Notice
Once you've created these, you'll just need to assign them in the Call Queuing call routing Module!
1. In the Dashboard, go to Voice > Inbound Settings > Routing.
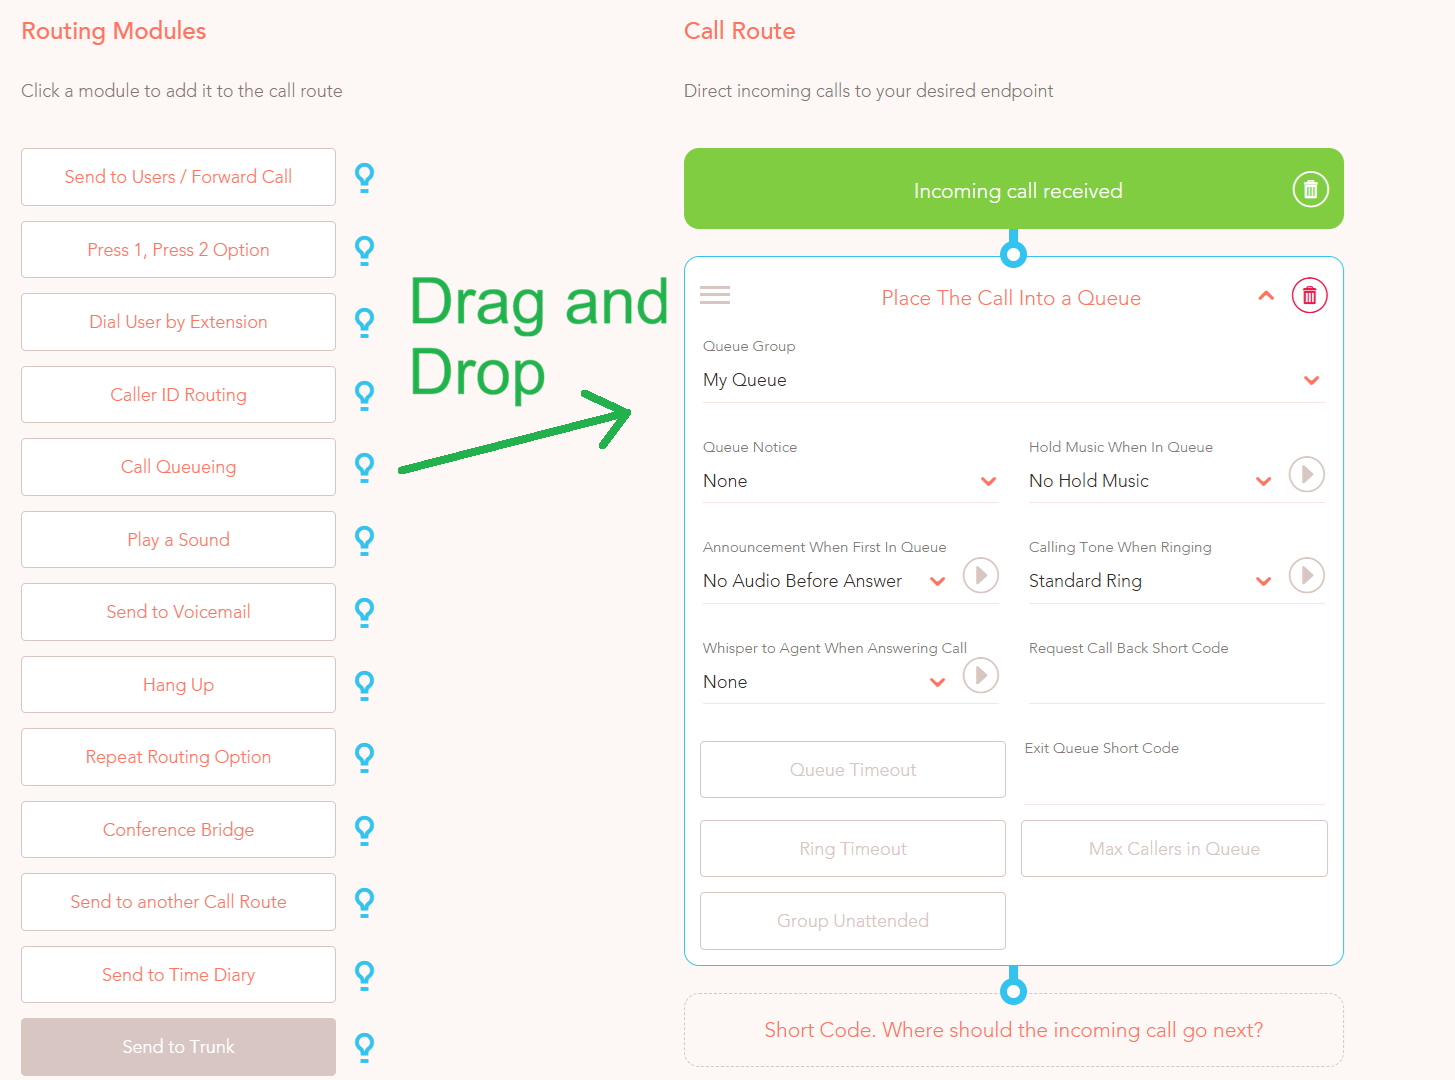
2. Click Add Call Route and on the left-hand side you'll see a module named "Call Queueing". Select this option, or drag-and-drop this module into your Call Route on the right.
3. A box will appear in your call route so that you can specify the Queue the call should drop into, the Queue Notice to be played, as well as the Hold Music you'd like to play while the caller is waiting. You can also play an announcement when someone reaches first position in the Queue (you can upload a custom Audio File in the Audio Section) and even choose the Calling Tone when the caller starts ringing through to your Users!
Below the main options; there are different scenarios in which you may want to re-route calls from the Queue:
Queue Timeout -
This will determine how long (max), you would like the caller to be in the Queue for.
You have the options of 1, 2, 3, 5 and 10 minutes, as well as being able to disable these options completely.
You can then choose what you would like them to do - such as leave a voicemail, or play a message to call back another time.
Ring Timeout -
This option specifies how long a call should ring when it reaches a user before it moves to the next action.
You can set the ring duration in seconds, and after this time, the call can either be sent back to the queue, forwarded to another user, or directed to voicemail.
Max Queue Callers -
This setting allows you to define the maximum number of callers that can wait in the queue simultaneously.
Once this limit is reached, you can decide what should happen to new incoming calls, such as playing a busy message, redirecting to voicemail, or offering a callback option.
Request Callback -
The callback code holds the caller’s place in the queue and then ends the call for the caller.
When a user becomes available, they will receive a call which, if they answer, will automatically make an outbound call to the caller who requested the callback.
Exit Queue Short Code -
This enables you to create a shortcode that you can either keep internally or give to certain clients, that when they dial will exit the Call Queue, and here you can dictate where you'd like them to go.
Group Unattended -
This would only occur when all the users are unavailable, such as if they had dialled a shortcode to set themselves as unavailable, or a loss of connection to our service meant the calls couldn't be answered, and you can choose what you would like to happen in those events.
Once you've saved and assigned your Call Route to a number, you'll be ready to go!
If you have any issues once the call queue has been created, please have a look through our page on Troubleshooting Call Queue Issues!